
Design & Engineering for Kids: How Maker Projects Teach Problem Solving

From building the highways and railways that connect nations, to creating a sleeve so your hands don’t get too hot when holding coffee, design and engineering are the basis of innovation and solving everyday problems. Without these disciplines, we would not have many of the necessities we use everyday such as refrigerators, seatbelts, and phones.
Problem solving skills for children are vital to promote social emotional learning and real life skills. In an “Ask the Expert” video from NC State College of Education, Assistant professor of STEM education, Tamecia Jones emphasizes the importance of engineering for kids, “At the heart of engineering is problem-solving. Even if a student doesn’t become an engineer, they will still have some type of problem to solve. The skills they learn in engineering courses teaches them habits of mind they can use for the rest of their life.”
Maker projects foster problem solving skills and resilience through trial and error and innovative thinking. The design and engineering process provides students with a structured, multistep process for approaching and resolving problems.
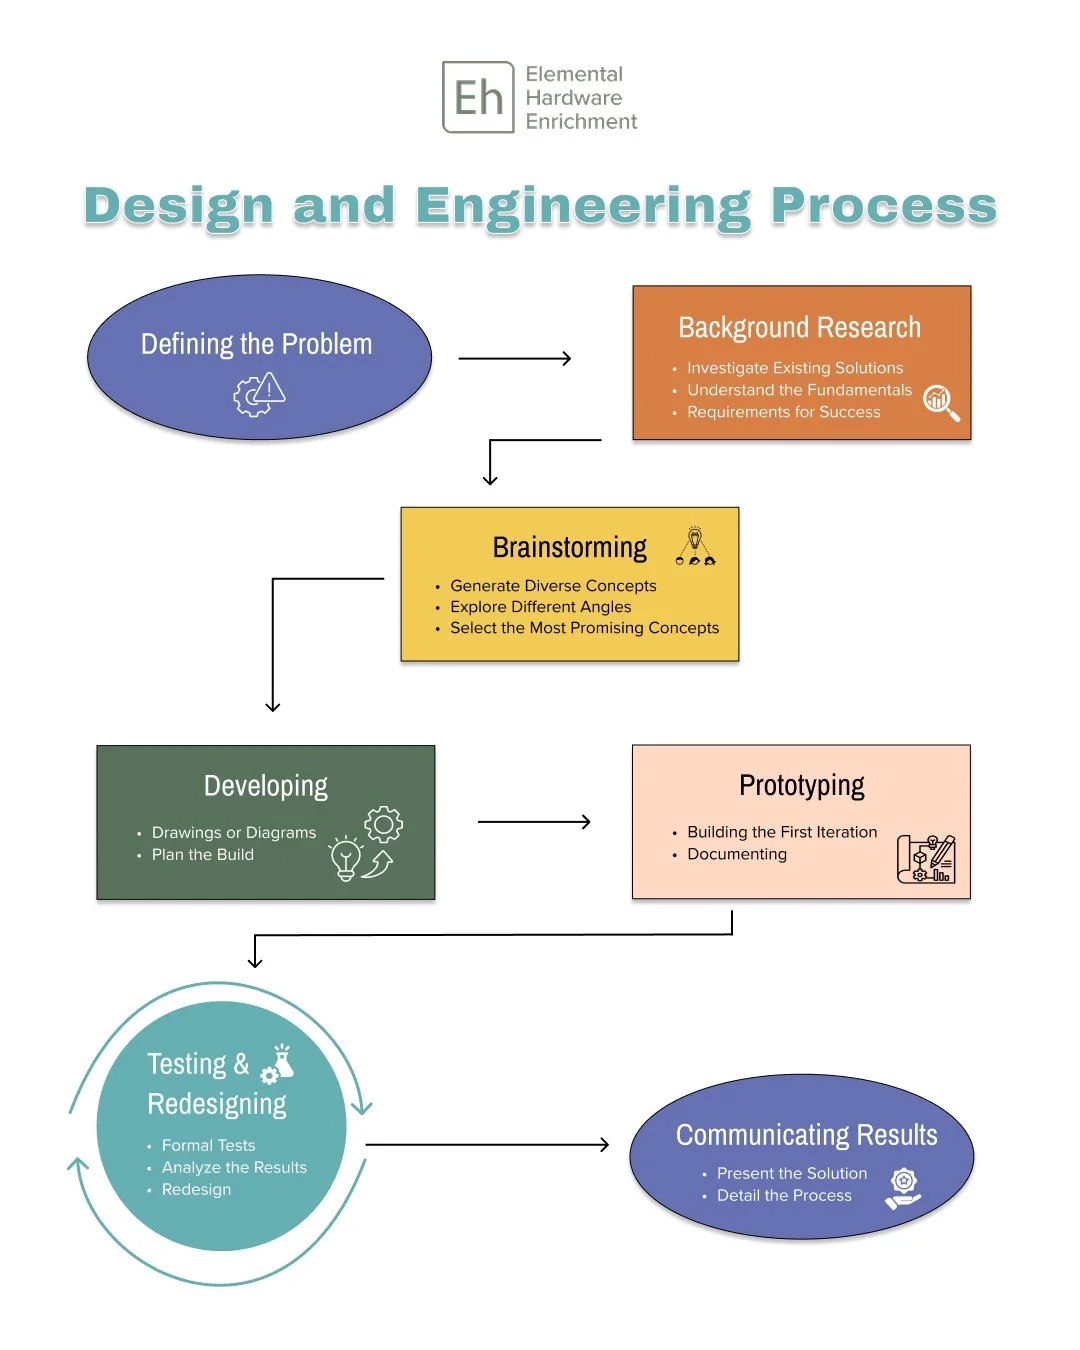
The design and engineering process involves several steps that foster critical thinking skills within each:
Defining the problem
Background research
Brainstorming
Developing
Building a prototype
Testing and redesigning
Communicating results
Defining the Problem
The ability to identify when something is wrong, inefficient, or needs to be changed is a vital life skill that students can build and sharpen through hands-on maker projects. Before diving into solutions, young engineers must first articulate the problem they are trying to solve. This will often involve defining the person or group affected by the problem, which helps kids with social-emotional learning in developing a stronger sense of empathy. With a clear, well-defined problem and audience, students can be guided towards successful solutions that drive real impact and value.
Background Research
Once the problem is defined, the next step is to gather information and context. This phase of the design and engineering process is when students can become experts on their topic.
Investigate Existing Solutions: Students should research how others have attempted to solve similar problems. What worked? What failed? This prevents them from 'reinventing the wheel' and provides a baseline for innovation.
Understand the Fundamentals: To prepare to develop solutions, students should explore the fundamental scientific principles and technological concepts relevant to the project. For example, if designing a simple bridge, students can research concepts like load-bearing capacity, materials science, and tension, all of which are vital to understand when building a bridge.
Requirements for Success: To know if their solution succeeds, students should clearly state what the final product or solution must achieve. A bridge may sound like a simple structure to build, but if the requirement is that it must be a drawbridge that can be lifted to allow boat traffic to pass through, it will certainly add complexity and critical checkpoints throughout the building process. Think of requirements as a checklist for the design. They are the essential “must-have’s” for the testing phase. Requirements should be quantifiable and specific such as “must hold a minimum of five pounds” or “must stand for at least thirty seconds” – the more specific the requirement, the more confident you can be that the solution being built will have the impact that you are trying to achieve.
By researching and contextualizing a problem, students foster problem-solving skills through learning how to connect different concepts. A crucial part of this process is the ability to discern important information from irrelevant details.
Brainstorming
With a solid understanding of the problem, the necessary background knowledge, and the requirements for a successful outcome, a student can enter the brainstorming phase of the design and engineering process. This step involves the following activities:
Generate Diverse Concepts: Encourage a free flow of ideas. Use techniques like sketching, mind-mapping, or rapid-fire listing to generate as many potential solutions as possible. This is a great way for students to collaborate with one another.
Explore Different Angles: Challenge assumptions and look at the problem from various perspectives. Again, this is another opportunity for students to practice their communication, teamwork, and collaboration skills. When students are prompted to ask questions and have discussions with one another about their perspectives on a solution, they will be more likely to surface all possible solutions as opposed to shutting down an idea before fully exploring it.
Select the Most Promising Concepts: After the initial brainstorming, evaluate the generated ideas against the requirements for success that were determined during the research stage. It is also important to identify any possible constraints (time, money, people, and technology are the most common constraints). Narrow down the possibilities to a few top contenders that will move into the next phase.
The brainstorming and selection process described promotes problem-solving by encouraging divergent thinking and forcing students to think outside the box to come up with as many solutions as possible. It also prompts students to consider different perspectives and look beyond the obvious. Through the selection process of all of the diverse concepts and solutions, students must critically evaluate their ideas, sharpening their problem-solving skills.
Developing
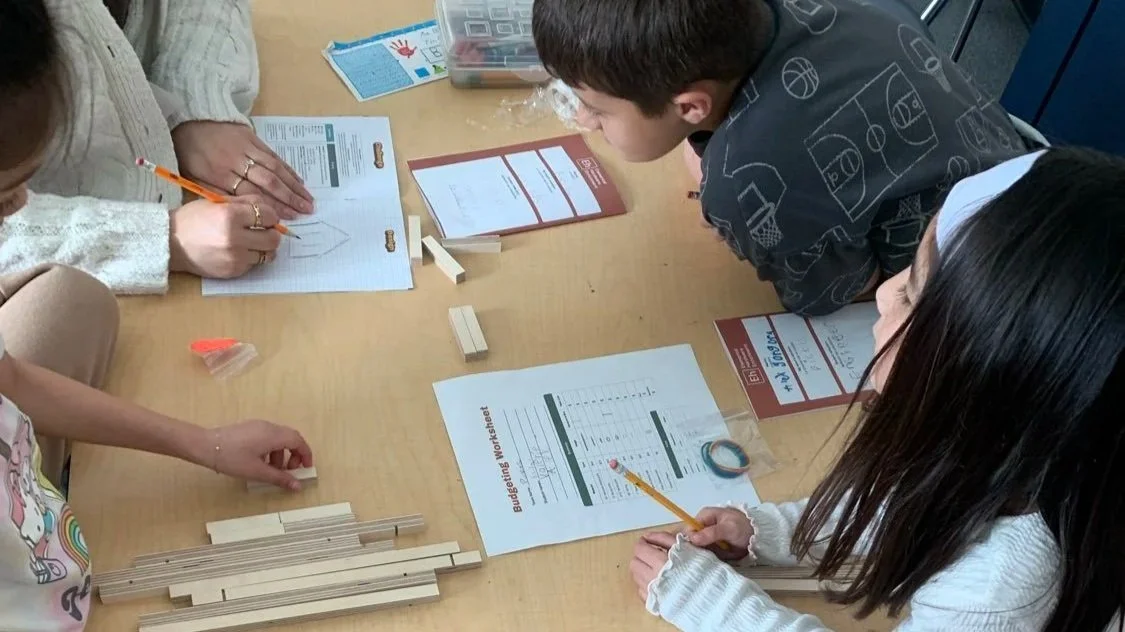
This stage is where the selected concepts are refined and transformed into a detailed plan. During this phase, students will design and model their solution by creating drawings or diagrams to specify the dimensions, materials, or mechanisms of their creation. Calculations are important to ensure that the design is sound from an engineering perspective, such as structural integrity or energy efficiency. The last part of the developing process would be to plan the build. Through this step, students create an outline for the next steps they will take to develop the prototype, including the materials and tools necessary.
Developing a solution fosters problem solving skills by encouraging students to thoughtfully plan their solutions. This stage requires students to synthesize their ideas with their research to solve a problem.
Prototyping
The prototyping stage is the transition from concept to reality. During this process, students physically construct a preliminary model of their solution. Prototyping typically involves two key activities:
Building the First Iteration: Using the developed plan, students will construct the model, keeping the focus on function over aesthetics. For prototyping, materials are often different from the final product, and not as polished. It is purely to test if the solution will operate.
Documenting: During the prototyping process, students should record any unexpected difficulties or necessary on-the-fly modifications during the build. This documentation is valuable for understanding why the final prototype might deviate from the initial design.
The prototyping stage promotes problem-solving by requiring students to translate their plan into a tangible product. As students build, they will often run into constraints or flaws in their initial plan, forcing them to critically evaluate the problem and quickly come up with practical solutions. The documentation process of prototyping will also help students reflect on why their initial solution might have succeeded or failed.
Testing and Redesigning
This is the cycle that truly defines engineering, showing students that failure is a learning opportunity. Some of the process includes:
Formal Tests: This is the part where students will compare the prototype to their specified requirements for success and collect the data. Did the bridge hold five pounds? Did the tower stand for thirty seconds?
Analyze the Results: Students should compare the test data to the initial requirements, identifying exactly why the prototype succeeded or failed in certain areas.
Redesign: Based on the test results, identify flaws and brainstorm improvements. Go back to the Developing and Prototyping stages to implement changes. The engineering process is rarely a straight line; it operates in more of a cycle or loop from identifying a problem to iterating on the solution.
Communicating Results
The final step in the engineering process is to present the results and the approach to the problem.
Present the Solution: Students should clearly explain the final design, how it addresses the initial problem, and how it meets the requirements.
Detail the Process: It is important to describe the engineering journey, including the initial problem definition, the research findings, the different designs considered, and the failures and iterations that led to the final product.
Reflect on Learning: Discuss the skills gained, the concepts mastered, and what could be done differently in the next project. This reflective component solidifies the learning experience and hones in on problem solving skills.
Throughout the entire engineering process, children can strengthen their problem solving skills. Whether they realize it or not, children use the design and engineering process in everyday life to solve problems. Maker activities formalize this inherent process, providing kids with structure and steps to approach challenges. This practice is key to developing flexible thinking and the confidence to embrace failure as a step towards innovation.
At Elemental Hardware Enrichment, we believe that maker projects are catalysts for growing problem solving skills in kids. You can learn more about our DIY Makers Programs to see how our curriculum utilizes the engineering process to increase student engagement in STEM and design thinking.